Edit an Existing Customer's Address
View Existing Customer Number
View Customer Owned Equipment in Service Shop Management
View Open Work Orders for an Existing Customer
View Accounts Receivable History
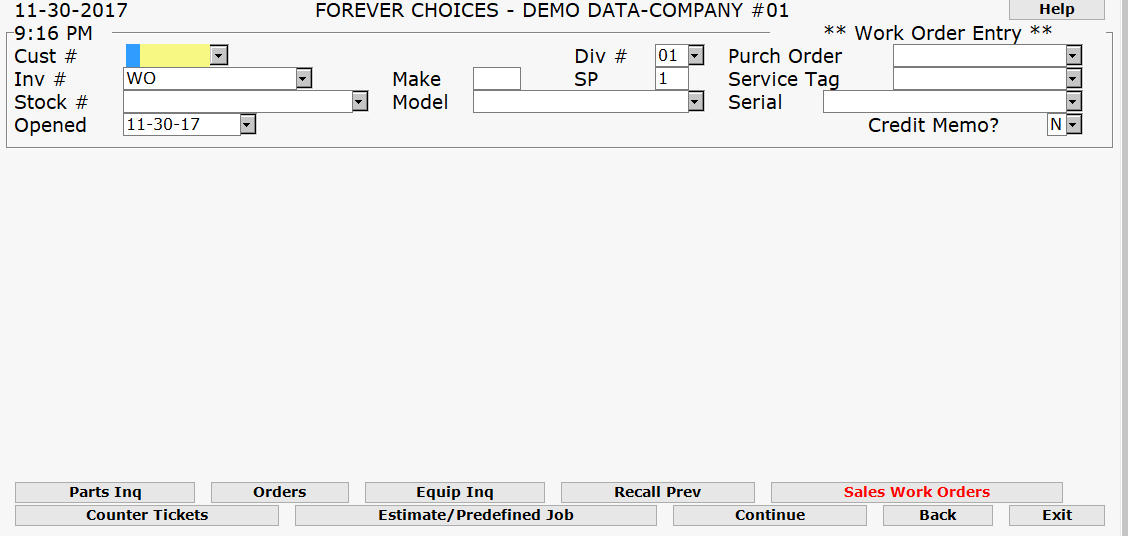
The header appears at the top of the Work Order entry screen and will remain there through the entry process.
Select Service Shop Management Menu>>Processing>>Work Orders.
Complete this screen. (Click on a field name for an overview. An asterisk (*) denotes required fields.)

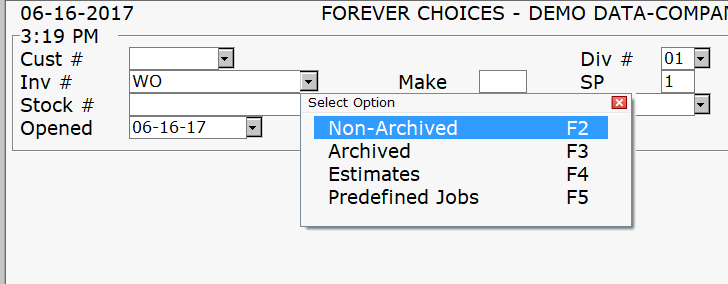
Non- Archived Screen Display

Archived screen display

A new button has been added indicating if a Sales Work Order has been created when an equipment sale was closed. The service sales notes from Sales Portal will populate the internal comments for instruction and the status of the work order will indicated Sales Work Order.

Once all the header information is entered accurately, press ENTER to continue entering the detail portion(s) of the work order. A message could appear notifying a user if other use are currently viewing/editing the same invoice. NOTE: If birthday and anniversary dates are set in contact information, then they will be reminders. If an equipment item has been previously sold or transferred, you will receive a message telling you the date it was sold or transferred and that the information will post to cost of goods sold.
Complete the next screen. (Click on a field name for an overview)

When finished entering information on the authorization and usage screen, press ENTER to create a work order segment (one work order can have multiple segments).
Complete the next screen. (Click on a field name for an overview. An asterisk (*) denotes required fields.)

Charge to (C)ustomer, (I)nternal, (W)arranty
Sale Account Subledger Code and Sales Tax Code
Specify (1) Major or (2) Minor Service
Enter an Expense GL Account No.
This field will only appear if Internal is the "Charge to". A stock order can be entered in the header and there is an
ability to override to enter an expense account by pressing F4.
Enter a Warranty AR Account No.
This field will only appear if Warranty is the "Charge to."
Press F2 to receive a list of Account Receivable Customer's.
|
A message will appear in the invoicing programs to notify a user if other users are currently viewing/editing the same invoice. |
Work Orders Pre_Defined_Service_Jobs

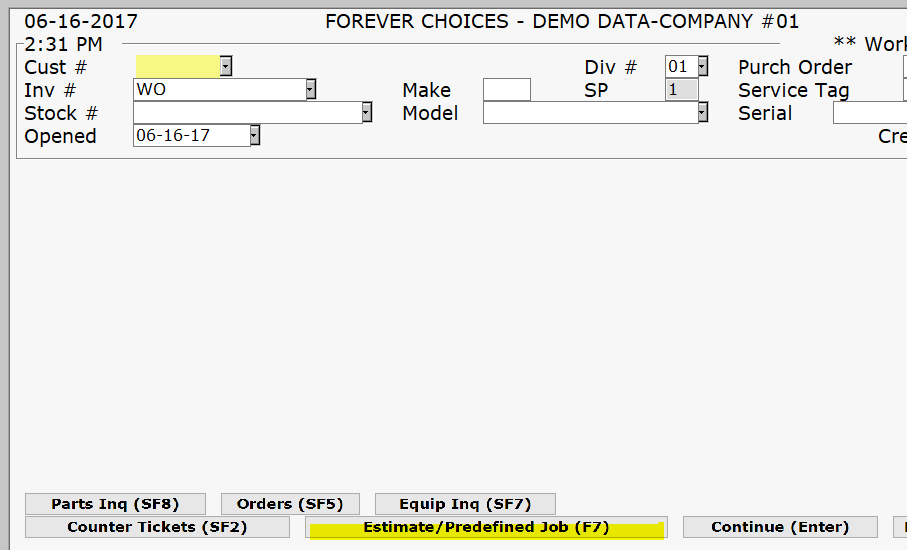
You will then be prompted to do an estimate or a pre-defined job

If predefined job you must enter it name

The invoice number begins with SP
You can call up quotes invoices and special jobs from the invoice number filed

Entering Detail Transactions Types such as: parts, freight, labor, mileage, etc.
Press ESC from the "Select Detail Transaction Type" screen to return to the "Segment" screen.
Down arrow to "Add New Segment to Work order." This is only necessary if you wish to add a new segment. An invoice is valid with only ONE segment.
Print and/or Close and invoice - Press F10
If you choose an option that has the word CLOSE, you will be prompted for a method of payment. This invoice is now considered final.
Note: You can move from different transaction types by using your mouse to click on the headings such as Prt, Lbr, Frt etc. You may also press the letter that corresponds to the transaction type or utilize the up and down arrows. Click on the following links to learn more about each topic.
Press ENTER after choosing the correct customer number.
Choose Comment from the Detail Transaction Type pop-up.
The Comment Detail Entry screen will appear.
Enter up to 99 lines of comments.
F3 is used to Delete the line with the cursor.
F4 is used to Insert a line above the line with the cursor.
When you have finished entering the comments, press ENTER to accept your entry. These will print on invoices.
|
If a comment exists, it will say one exists and will print on the invoice. |
|
To use the Labor Entry screen you must have previously setup all the proper codes used here in the Service Shop Management module. If necessary, refer to Setting Up Labor Rate Codes. |
Press ENTER after choosing the correct customer number.
Choose Labor from the Detail Transaction Type pop-up.
The Labor Detail Entry screen will appear.
Complete this screen. (Click on a field name for an overview. An asterisk (*) denotes required fields.):

T
*Rate
T
SPG Code
Short Description
5. Press ENTER to save the labor line and advance to the next line.
6. If you wish you can call in standard repair time from CNH if you have the CNH Interface Bundle, or KTC from Kubota, call Basic Support for more information. You can search by serial number of model. There two tabs on the right side of the screen. The guided view is a pictorial approach to the standard repair time. The second tab is the tree view and you can search by description.
7.If you need to delete a line, highlight the line and press F3.
8. When you are finished entering your transaction(s), you may press F10 to print the invoice. Or, press ESC to return to the transaction option screen.
Entering Parts on an Invoice
To use the Parts Entry screen, you must have previously setup at least one Manufacturer. |
Press ENTER after choosing the correct customer number.
Choose Parts from the Detail Transaction Type pop-up.
The Parts Detail Entry screen will appear.
Begin typing in the Part Number. A list of all parts in your inventory will appear and begin narrowing down based on your input.
Press ENTER.
Complete this screen. (Click on a field name for an overview. An asterisk (*) denotes required fields.):

T
Some options on this screen:
If you need to delete a line, highlight the line and press F3.
To view the History on this part, press F5.
F6 allows you to open a picklist either created in a catalog (a manufacturer interface within the business system) or created in the option PickList Manager on the Parts Admin Menu.
To view / switch to the Order Detail Entry screen, press F7.
SF1 allows the viewing of all available function keys from this screen
SF3 selects the current salesperson
SF4 changes the assigned salesperson if proper permissions are set.
SF5 allows you move parts from one segment to another, utilize the insert key to highlight the parts and then SF5.
SF7 remote part look up.
SF10 Tax detail of a part.
CF8 display hide profit of parts entered, toggle press for on, press again for off.
F5 Shows salesperson and date the transaction was entered.
CF9 allows you to reprice parts.
CF10 allows you to override part fees.
When you are finished entering your part(s), you may press ESC to return to the detail transaction type screen or press F10 (print options) if you have added everything you need to complete the invoice.
If you try to add a part that is already on the ticket, it will display a message and give you the ability to edit the existing part detail lines of add another one.
Press ENTER after choosing the correct customer number.
Choose Freight from the Detail Transaction Type pop-up.
The Freight Detail Entry screen will appear.
Enter the Transaction Type, press F2 for a pop-up list, or leave the field blank for normal charge.
Complete this screen. (Click on a field name for an overview. An asterisk (*) denotes required fields.):

T
T
Press ENTER to accept this transaction line.
If you need to delete a line, highlight the line and press F3.
When you are finished entering your freight, you may press ESC to return to the detail transaction type screen or press F10 (print options) if you have added everything you need to complete the invoice.
Press ENTER after choosing the correct customer number.
Choose Mileage from the Detail Transaction Type pop-up.
The Mileage Detail Entry screen will appear.
Enter the Transaction Type, press F2 for a pop-up list, or leave the field blank for normal charge.
Complete this screen. (Click on a field name for an overview. An asterisk (*) denotes required fields.):

T
T
Press ENTER to accept this transaction line.
If you need to delete a line, highlight the line and press F3.
When you are finished entering your mileage, you may press ESC to return to the detail transaction type screen or press F10 (print options) if you have added everything you need to complete the invoice.
Press ENTER after choosing the correct customer number.
Choose O-Other from the Detail Transaction Type pop-up.
The Other Detail Entry screen will appear.
Enter the Transaction Type, press F2 for a pop-up list, or leave the field blank for normal charge.
OTHER detail entry screen |
|||
T |
T
|
||
Popup |
Edit Delete |
Print Options |
Exit |
Press ENTER to accept this transaction line.
If you need to delete a line, highlight the line and press F3.
When you are finished entering your charges, you may press ESC to return to the detail transaction type screen or press F10 (print options) if you have added everything you need to complete the invoice.
|
The default posts to outside labor. |
Shop supplies can be set up under the main Administration area to calculate automatically as a percentage of labor.
Press ENTER after choosing the correct customer number.
Choose S-Shop Supplies from the Detail Transaction Type pop-up.
The Shop Supplies Detail Entry screen will appear.
Enter the Transaction Type, press F2 for a pop-up list, or leave the field blank for normal charge.
Complete this screen. (Click on a field name for an overview. An asterisk (*) denotes required fields.):
SHOP SUPPLIES detail entry screen |
|||
T
|
T
|
||
Popup |
Edit Delete |
Print Options |
Exit |
Press ENTER to accept this transaction line.
If you need to delete a line, highlight the line and press F3.
When you are finished entering your shop supplies, you may press ESC to return to the detail transaction type screen or press F10 (print options) if you have added everything you need to complete the invoice.
Press ENTER after choosing the correct customer number.
Choose I-Internal Comments from the Detail Transaction Type pop-up.
The Comment Detail Entry screen will appear.
Enter up to 99 lines of comments.
F3 is used to Delete the line with the cursor.
F4 is used to Insert a line above the line with the cursor.
When you have finished entering the comments, press ENTER to accept your entry.
|
If a comment exists, it will say one exists. Internal comments will print on counter picking tickets and technician shop tickets. |
Making a Deposit
When that payment invoice is posted, the amount received as a deposit will post to the default cash account and a credit is posted to the General Ledger account that is entered in the Customer Deposit Account field on the Key GL Accounts. When the customer deposit General Ledger account is posted, the customer's name will be printed in the description column in the General Ledger transaction detail report.
Press ENTER after choosing the correct customer number.
Choose D-Deposit from the Detail Transaction Type pop-up.
Choose the Method of Payment and press ENTER.
Type in the Amount and press ENTER.
Customer Deposit information will appear and the amount will show on the next line. Press ENTER to accept.
Partial Deposits
When a partial cash payment is received, you should enter it on the same invoice as the charges. The amount received will be subtracted from the charge amount and be reflected in the Amount Due column of that invoice. This feature allows the customer to pay a partial amount of the invoice and charge the remaining balance to either an in-house account or credit card. The system will post the amount to the default cash account for invoices with partial cash payments that are closed. For invoices with partial cash payments that are left open, the daily posting procedure will debit the cash and credit the same amount to the Customer Deposit Account. When the invoice is then closed and posted, the program will then debit the Customer Deposit Account.
1. Press ENTER after choosing the correct customer number.
2. Choose P-Parts from the Detail Transaction Type pop-up.
3. Add the items the customer will be placing a deposit on.
4. From the "Select Detail Transaction Type" screen choose DEPOSIT
5. Type in the amount and press ENTER.
6. Choose the Method of Payment and press ENTER.
7. Now you can F10 and Print Preliminary invoice or Press ESC to get out of the invoice.
Work Order Bill to Ship to
Choose B-Bill To / Ship To Addresses from the Detail Transaction Type pop-up.
The Bill to Ship to Detail Entry screen will appear.
The program will default to the information from the customer entered on the header of the invoice. If pre existing ship to addresses are available they can be viewed by pressing or clicking on SF3.
You can add a one time only address by leaving the ship to account number blank and manually typing in an address.
View Customer Owned Equipment through Service Shop Management
Select Service Shop Menu>>Processing>>Work Order
Enter the Customer # or press F2 for a list of existing customer numbers and press ENTER.
Press F3 for a list of customer owned equipment.
If no equipment is found for the customer, the message "No Matches Found" will be displayed.