Parts Information
The Parts Information program is the primary
place where you will go to maintain and display the accumulated information
about your Parts Inventory. Every sale, return, adjustment, order receipt,
etc. will be recorded for each part and stored for easy retrieval and
evaluation.
Enter New Parts
Create Memo Lines
Printing
Bar Code Labels
Lookup Part
Information at a Remote Location
Make Price
Changes
Enter
New Parts
Select Parts
Inventory Menu>>File Update>>Parts Information.
Enter the Manufacturer's
Part number .
Enter the Manufacturer
(Mfr) and Supplier
(Sup) code. This is
a predefined code identifying the manufacturer/supplier
of the part.
Press ENTER.
It will tell you that you
have entered a part that is not on file, and then ask you if you wish
to add the new part to your inventory. 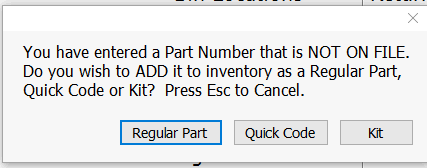
You can select Regular
Part or Quick
Code or Kit according to the characteristic
of the part number you typed in.
Kit information: To
successfully create a kit, enter a value for your kit part number
as desired and press enter. Select kit an OK. After the kit number
is created, press F10 to add parts to the kit that are to be sole
as an association.
Rules for kits
On hand quantity
for the kit part number will be presented as to total kits
that you can fill based on the inventory of the associated
parts.
A part in a kit cannot
be a kit
A part in a kit can
be a quick code that points to another part.
A quick code can
point to a kit
Pick lists can contain
kit
When you invoice
the kit part number, the kit part will be in bold and the
parts included in the kit will be in gray.
The kit part number
will be the only thing that prints on the invoice. All items
will print on the packing slip and the picking ticket.
When parts in the
kit need to be ordered, it will automatically add to the INPROC
order if you are using that option.
Posting results of
the kit part numbers will include retail being controlled
by the kit part number and the cost coming from the individual
parts that make up the kit.
Complete this screen. (Click on a field name for an overview.
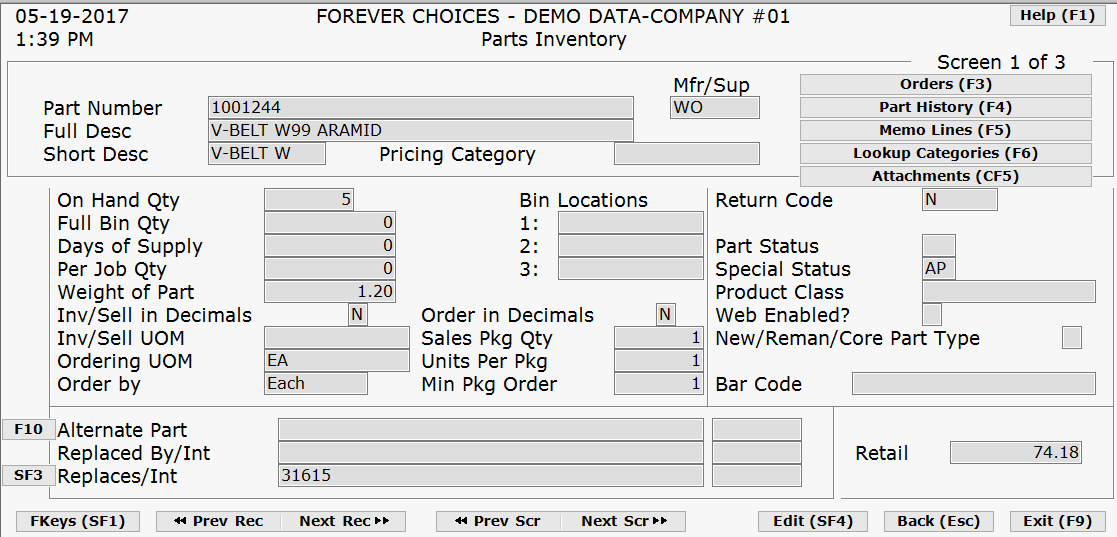
Part Number
Full Desc
Short Desc
Pricing
Category
On Hand Qty
Full Bin Qty
Days
of Supply
Per
Job Qty
Weight of Part
Inv/Sell
in Decimals
Inv/Sell
UOM
Ordering
UOM
Order
by
Bin Locations
Order
in Decimals
Sales Pkg Qty
Units
per Pkg
Min Pkg
Order
Return
Code
Part Status
Special
Status
Product
Class
New/Reman/Core Part Type
Bar
Code
Bar
Code
Retail
PAGE
DOWN TO SECOND SCREEN
Complete this screen. (Click on a field name for an overview. An asterisk
(*) denotes required fields.)
Keep Sale History
Date Part Entered
Date Last Sale
Date Last Counted
Qty Last Counted
Best
Reorder Point
Manual
Best
Stocking Level
Manual
Months
in inv to auto order
Part
Ordered Locally
Last
Ordered
Date
No.
Qty.
Last Receipted
Date
Qty
Range
of Seasons
Days
Lead Time
Beginning Month
Ending Month
Days Lag Time
Marketing
Code
Product Line
Promo ID
Mfr ID
DirectShip
Use DirectShip
Cost
PAGE
DOWN TO THIRD SCREEN
Complete this screen. (Click on a field name for an overview. An asterisk
(*) denotes required fields.)
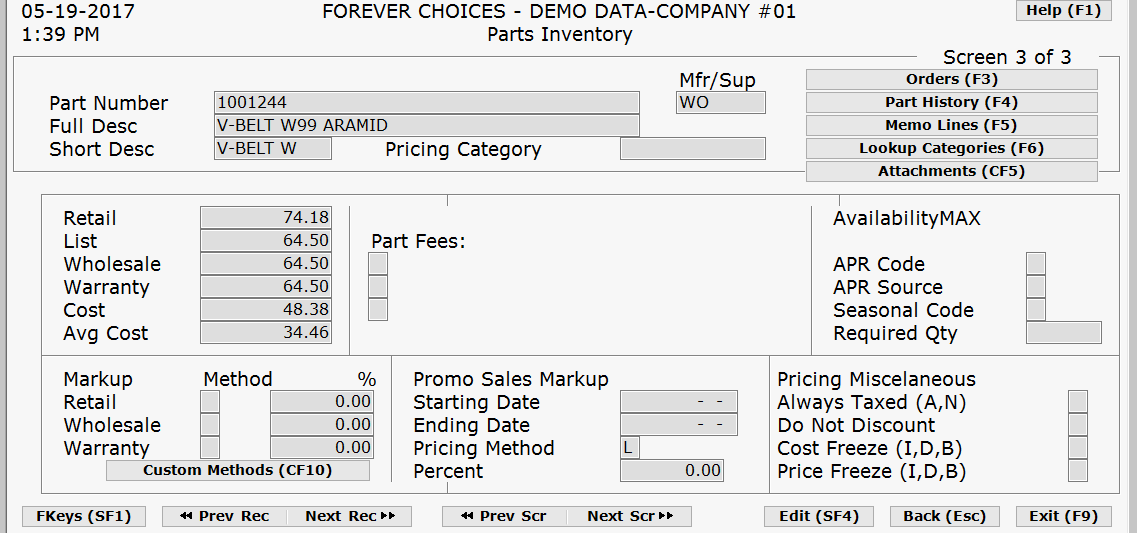
Retail
List
Wholesale
Warranty
Cost
Avg
Cost
Parts Fees:

AvailabilityMAX
APR Code
Seasonal Code
Required
Qty
MARKUP Method %
Retail
Wholesale
Warranty Method
CF10 Custom Methods
PROMO
SALES MARKUP
Starting Date
Ending
Date
Pricing Method
Percent
PRICING MISC
Always Taxed (A,N)
Do
Not Discount
Cost Freeze (I.D,B)
Price Freeze (I,D,B)
Press ENTER to save this record.
You may
enter another part number or press F9
to exit to the main menu.
Create Memo Lines
Change Memo
Line
Delete Memo
Line
Search
for Memo Line
There may be certain messages that you would
like to display about an individual part each time that part is accessed.
You can enter any type of message for parts that may be necessary. The
search function is available for memo lines..
Create
a Memo Line
Select Parts
Inventory Menu >> File Update >> Parts Information.
Type in a part number
or press F2 for a pop-up
list.
Press ENTER.
Press F5
(you will see this option in the upper right-hand corner of this
screen).
Type the message you
would like to appear as the memo line for this part and press
ENTER when complete. Press
ESC to exit the screen
without saving the information. If you press F5
again you can copy these notes. You can paste the notes
using CTRL-V
in other areas of the software or in a document. You can print
a part memo on an invoice by adding a "~" tilde at the
beginning of a memo.
Change an Existing
Memo Line
Select Parts
Inventory Menu>>File Update>>Parts Information.
Type in a part number
or press F2 for a pop-up
list.
Press ENTER.
Press F5
(you will see this option in the upper right-hand corner of this
screen).
Change the current message
as desired. Press F4
to insert a line if necessary.
Delete
an Existing Memo Line
Select Parts
Inventory Menu>>File Update>>Parts Information.
Type in a part number
or press F2 for a pop-up
list.
Press ENTER.
Press F5
(you will see this option in the upper right-hand corner of this
screen).
Press F3
to delete current message.
Search for a Specific Memo Line
1. Select Parts
Inventory Menu>>File Update>>Parts Information
2. Press F5
Search by Desc/bin
3. Type the wording
to find in the Memo Line field
4. Press ENTER
5. A list of parts
and their memo line that includes the wording will appear.
6. Highlight the part line and
press ENTER to access the specific
part.
Printing
Bar Code Labels from the Parts Master File
Select Parts
Inventory>>File Update>>Parts Information
Type in
the part number and press ENTER.
Press
Shift + F10
The quantity will default
to the part's on-hand quantity. You may override, if desired.
Choose the printer and
then the label layout (press ENTER
to accept the default).
Lookup
Part Information at a Remote Location
Select Parts
Inventory>>File Update>>Parts Information
Type in the part number
and press ENTER.
Press
Shift + F7
A window will appear
giving the part information requested.
Press Shift
+ F6 to view the part summary
or Esc to close the window.