|
Corrections to accounts payable need to be done in accounts payable. Do NOT make corrections through journal entries. You will get a warning when attempting to make a journal entry to the accounts payable accounts. |
Function Key Explanations |
|
|
|
To view a list of existing vendors |
|
|
To search for a particular vendor(s) according to given criteria To sort by certain criteria within the above F6 search To search with criteria that CONTAINS or STARTS WITH |
|
|
To lookup or change vendor information |
|
|
To select the invoice view |
|
|
To sort invoices according to options given |
|
|
To pay a payment towards the total invoice amount and pay immediately |
|
|
Save and post invoice |
|
|
To go back or exit program |
This option can be used to quickly create/print a check using a single option. The payee can be either a vendor currently setup in the system or a company/person that you choose to not setup as an Accounts Payable vendor.
Use this option to:
Adjust existing Accounts Payable invoices
Select and Pay existing invoices for current vendor
Add invoices and immediately pay
Add new invoices & select existing invoices to pay current vendor
Quick Check for existing vendor without adding a new invoice
Quick Check for non-Accounts Payable vendor
Expedite invoice before due date
Place an invoice on Hold status
Make a one time partial payment towards an invoice
Make an ongoing partial payment towards an invoice for all future check runs
|
Choose Accounts Payable Menu>>Processing>>Invoice manager /check on demand
Type the existing *Vendor Number or press F2/F6 for a list of existing vendors and press ENTER.
Press ENTER to add an invoice or begin typing the *Invoice # here and press ENTER.
Complete the invoice detail section (top section) as desired with applicable information. (Click on a field name for an overview. An asterisk (*) denotes required fields.)
Press ENTER to advance to the distribution section (bottom section).
After completing the necessary information, press ENTER to complete each line for distribution.
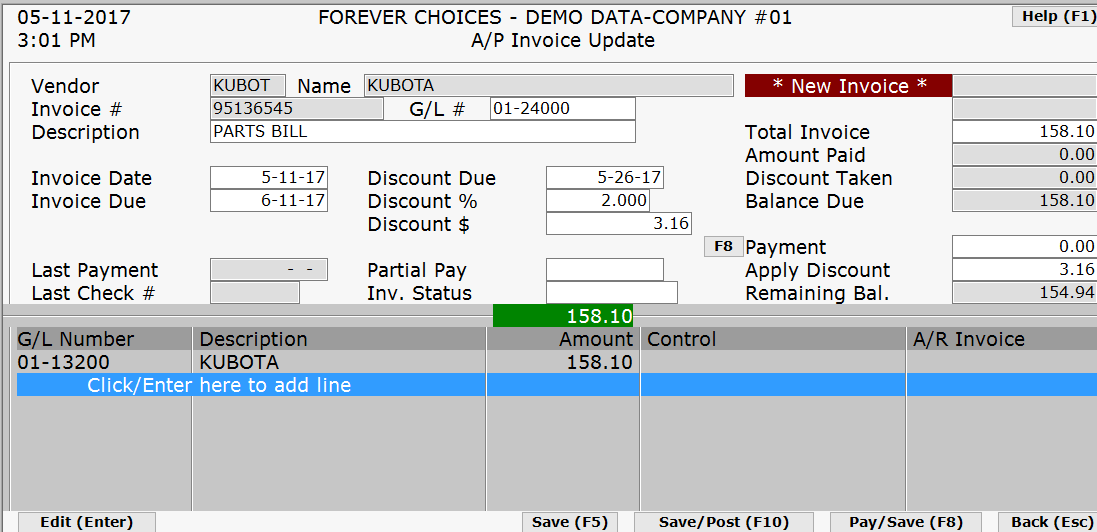
Invoice Date Discount Due Discount Taken
Invoice Due Discount % Balance Due
Last Payment Partial Pay Apply Discount
Last Check # Inv. Status Remaining Balance

Below are some options you will have after entering your invoice information:
Press F5 or click the button to save this invoice. This option can be taken when additional invoices are needing to be entered for this vendor. Press ENTER and you will be taken back to the invoice screen.
Press F10 or click the button to save and post this invoice. This option can be taken when this is the last invoice you will be entering for this vendor and you do not want to print the check yet.
Select the appropriate posting date and press ENTER.
Select Continue (Enter) to post the invoices.
You will be returned to the vendor field.
Type in another vendor to continue adding invoices or press Esc/F9 to exit program and return to the menu.
A posting edit list will print according to the print option of your choice.
|
Highlight the invoice to be adjusted and press ENTER.
Up arrow to the total invoice amount. In that field type in the new amount of the invoice. (Note: Zero is also valid and that will delete the invoice). The invoice will be adjusted either up or down accordingly and press ENTER.
Vendor |
Name |
|
|
|
|
|
|
||
|
|
|
||
|
|
|
|
|
|
|
|||
|
|
|||
|
|
|
|
|
|
|
|
|
|
|
|
|||
|
|
|||
Div G/L # |
Description |
Amount |
Control |
A/R Invoice |
Enter the Expense G/L # or F2 to lookup or if there is a vendor disbursement DISBURSED will appear |
|
If this is a credit memo, enter in a negative (-) amount. |
If Equipment G/L # - Enter Stock # If A/R G/L # - Enter Customer # F2 - Lookup Customer F3 - Lookup Current Equipment F4 - Lookup Sold Equipment |
|
Popup |
Save Invoice |
Save and Post |
Pay and Save |
Back |
If the Total Invoice amount is adjusted, the distribution section will appear (continue to Step 5). If the Total Invoice amount does not need to be adjusted, you will be returned to the list of invoices. Select another invoice to be adjusted or press Esc/F9 to be returned to the vendor field.
The amount that needs to be distributed will automatically appear and the cursor will default into the G/L # field. Accept or type in the General Ledger # you wish to use.
Accept the total amount by pressing ENTER or adjust the amount appropriately and advance to the next line.
Continue with Steps 5-6 until all distribution entries are complete and press F5or click the button to save the changes to the invoice.
Once all invoices are entered, press F10 to post this invoice's adjustments.
Select the appropriate posting date and press ENTER.
Select Continue (Enter) to post the adjustments.
You will be returned to the vendor field.
Type in another vendor to continue adjusting invoices or press Esc/F9 when finished adjusting invoices for all vendors.
Select and Pay existing Invoices for a current Vendor
Highlight the invoice to be paid and press the SPACE bar to mark it ready to pay. The amount in the Payment column will be highlighted.
If the wrong invoice was selected just press the SPACE bar again to un-select.
The check total will be calculating in the top right as each invoice is marked to pay.

Press F10 to print and post when all invoices that need to be paid have been selected.
Type the check number.
Verify check date and post date given.
Press ENTER.
Choose Print Check.
Select the printer in which you will be using.
Verify the check printed correctly. If necessary, choose the Print Check option again to reprint.
If check printed correctly, choose Post Transactions.
You will be returned to the vendor field.
Type in another vendor to pay invoices for or press Esc/F9 when finished.
Add invoices and immediately pay
Type the existing *Vendor Number or press F2/F6 for a list of existing vendors and press ENTER.
Press ENTER to add an invoice or begin typing the *Invoice # here.
Press ENTER after entering the invoice number.
Complete the invoice detail section (top section) as desired with applicable information.
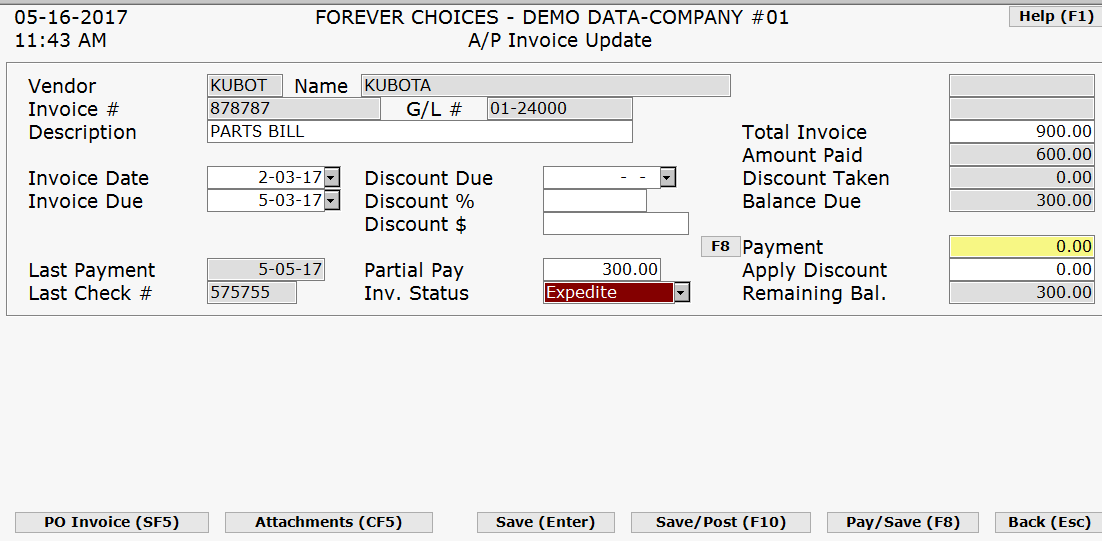
Press ENTER to advance to the distribution section (bottom section). Complete each line for distribution and press ENTER.
Type in the G/L # to record the first distribution.
After completing the necessary information, press ENTER to complete each line for distribution.
Press F8 to pay and save.
Notice the Amount Due and Payment columns are both highlighted. Why?
All invoices in the list with the Payment field highlighted will be included in the check total which will be calculating in the top right as each invoice is marked to pay.
Press F10 to print and post.
Type the check number.
Verify check date and post date given.
Press ENTER.
Choose Print Check.
Select the printer in which you will be using.
Verify the check printed correctly. If necessary, choose the Print Check option again to reprint.
If check printed correctly, choose Post Transactions.
You will be returned to the vendor field.
Type in another vendor to add and pay invoices for or press Esc/F9 when finished.
Select the printer in which you will be using for the edit list to print containing all transactions completed while in this option.
|
Remember, if you forget to press F8 Pay and Save while in the invoice screen, just highlight the invoice from the list of invoices and press the SPACE bar to mark as ready to pay.
You are not required to print a check when you choose F10 Print and Post, choose Post Transactions if you are processing an electronic transfer and only want to post this transaction. |
Add new invoices & select existing invoices to pay current vendor
Type the existing *Vendor Number or press F2/F6 for a list of existing vendors and press ENTER.
You may do all of the following options from the invoice screen:
Highlight the invoice(s) to be paid and press the SPACE bar to mark them ready to pay. The amount in the Payment column will be highlighted.

Press ENTER to open the invoice to indicate the amount you are wanting to pay on that invoice (if not the total amount).
Type an *Invoice # and press ENTER. Complete the invoice detail section (top section) as desired with applicable information. Press ENTER to advance to the distribution section (bottom section). Type in the G/L # to record the first distribution. After completing the necessary information, press ENTER to complete each line for distribution.
Press F8 to pay and save.
Notice the Amount Due and Payment columns are both highlighted. Why?
All invoices in the list with the Payment field highlighted will be included in the check total which will be calculating in the top right as each invoice is marked to pay.
Press F10 to print and post.
Type the check number.
Verify check date and post date given.
Press ENTER.
Choose Print Check.
Select the printer in which you will be using.
Verify the check printed correctly. If necessary, choose the Print Check option again to reprint.
If check printed correctly, choose Post Transactions.
You will be returned to the vendor field.
Type in another vendor to add and pay invoices for or press Esc/F9 when finished.
Select the printer in which you will be using for the edit list to print containing all transactions completed while in this option.
Quick Check for existing vendor without adding a new invoice
Type the existing *Vendor Number or press F2/F6 for a list of existing vendors and press ENTER.
Press F5 Quick Check.
The system will default to the default Expense General Ledger # that was setup in the Add a New Vendor procedure. If the default General Ledger number is okay continue to Step 4. If it needs to be changed do so at this time. If there was not a default Expense General Ledger # setup it will be blank and will need to be entered. Press F2 for a list of existing General Ledger numbers.
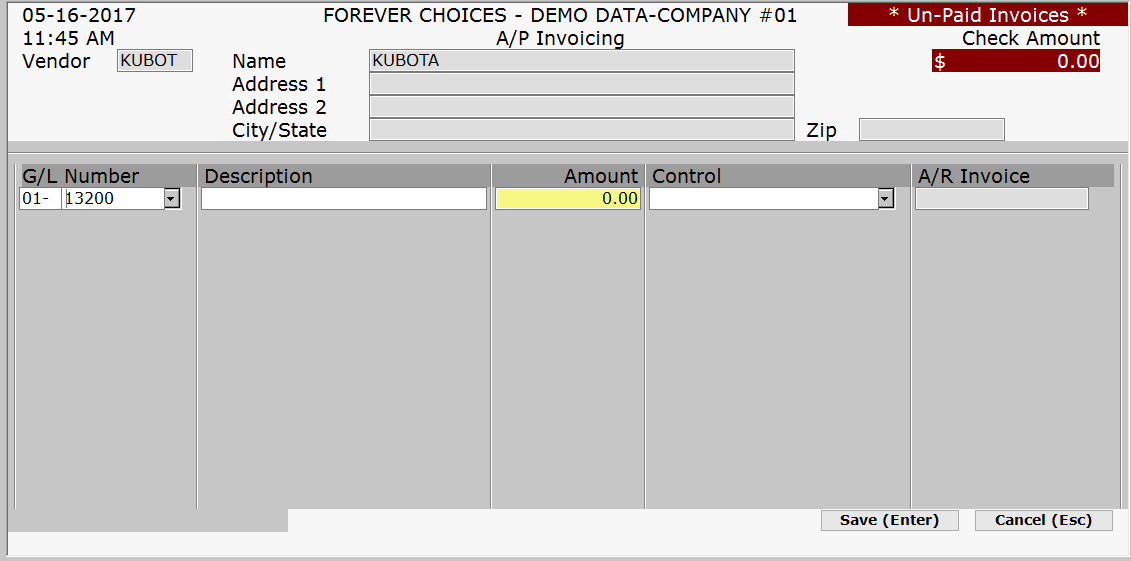
After completing the necessary information, press ENTER to complete each line for distribution of this invoice.
The check amount will appear in the top right.
Once the amount is correct and distribution is complete, press F10 to print and post.
Type the check number.
Verify check date and post date given.
Press ENTER.
Choose Print Check.
Select the printer in which you will be using.
Verify the check printed correctly. If necessary, choose the Print Check option again to reprint.
If check printed correctly, choose Post Transactions.
You will be returned to the vendor field.
Type in another vendor to add and pay invoices for or press Esc/F9 when finished.
Select the printer in which you will be using for the edit list to print containing all transactions completed while in this option.
Quick Check for non-Accounts Payable vendor
In a blank Vendor field press ENTER.
Type the Vendor Name and/or complete the address information.
Press ENTER.
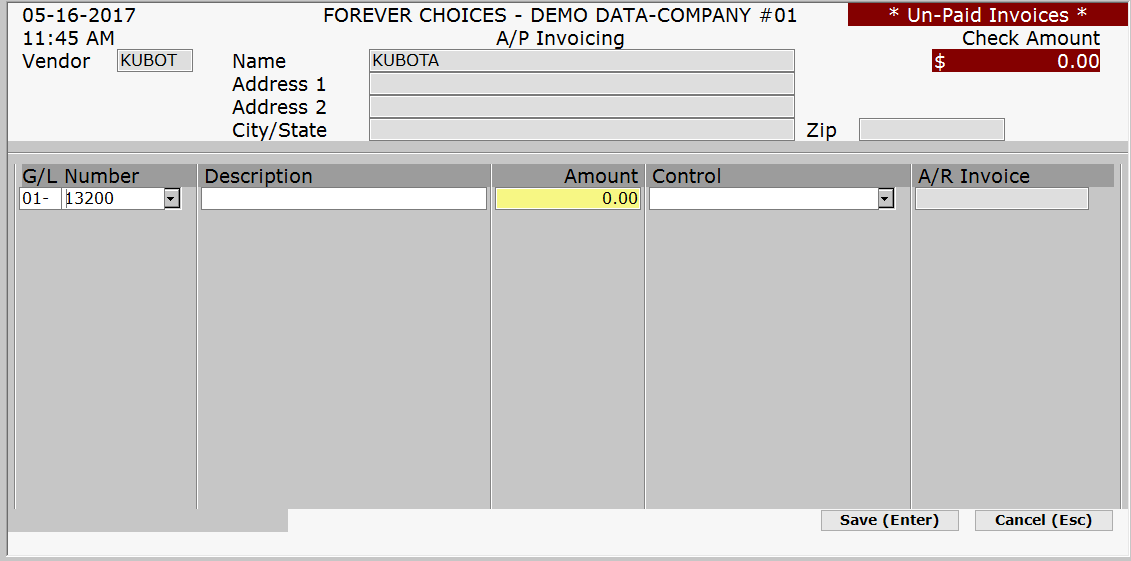
Type in the General Ledger #'s and amounts to distribute the invoice. Press F2 for a list of existing General Ledger numbers. After completing the necessary information, press ENTER to complete each line for distribution of this invoice.
The check amount will appear in the top right.
Once the amount is correct and distribution is complete, press F10 to print and post.
Type the check number.
Verify check date and post date given.
Press ENTER.
Choose Print Check.
Select the printer in which you will be using.
Verify the check printed correctly. If necessary, choose the Print Check option again to reprint.
If check printed correctly, choose Post Transactions.
You will be returned to the vendor field.
Type in another vendor to add and pay invoices for or press Esc/F9 when finished.
Select the printer in which you will be using for the edit list to print containing all transactions completed while in this option.
Expedite invoice before due date
If an invoice is in the Outstanding Invoice file in Accounts Payable and needs to be paid with the next check run, regardless of the invoice due date, you may expedite the payment.
Highlight the *Invoice Number or type in the invoice number and press ENTER.
Type an E in the Status field (located in the middle column)
Press ENTER and the screen will display the list of invoices. The invoice changed to E will appear with EXPEDITE in the Desc./Status field.
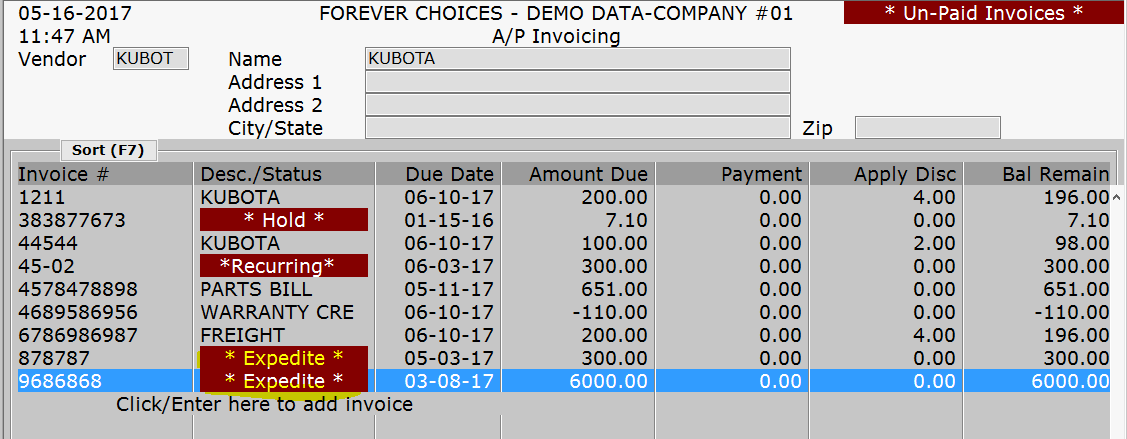
Press Esc to exit.
Place an invoice on Hold status
Select Accounts Payable Menu>>Processing>>Invoice manager/check on demand.
Highlight the invoice number or type in the invoice number and press ENTER.
Type an H in the Status field (located in the middle column)
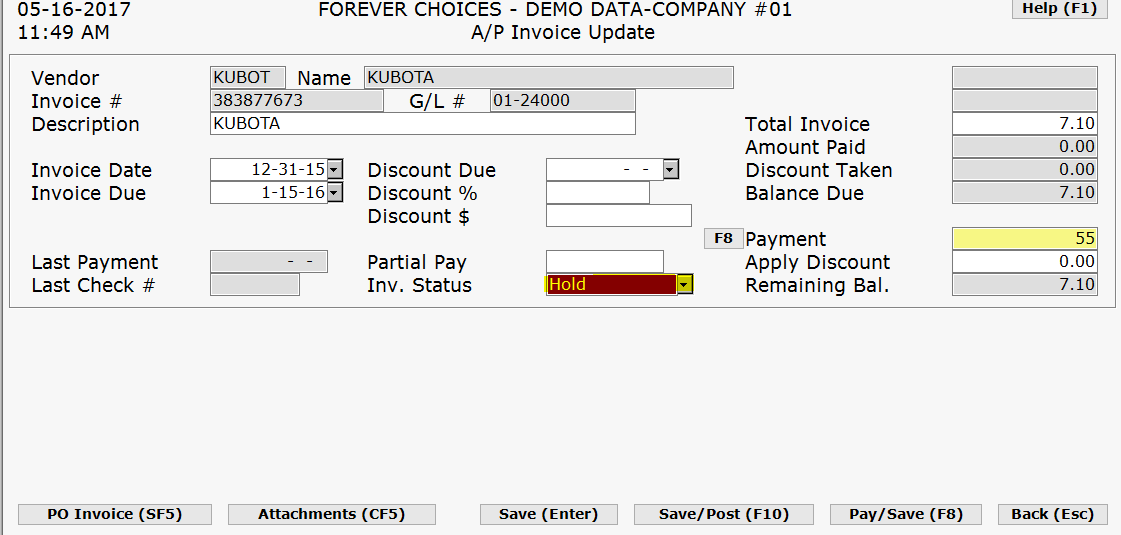
Press ENTER and the screen will display the list of invoices. The invoice changed to H will appear with HOLD in the Desc./Status field.

Press Esc to exit.
In the Inv Status field you can select recurring and then will be prompted to select the number of payments
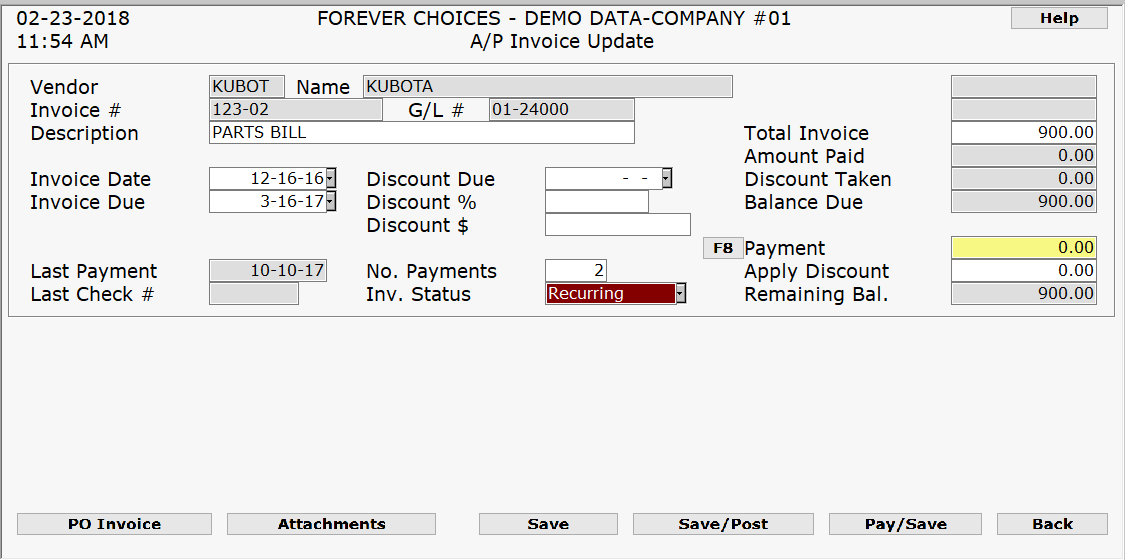
When doing recurring entries, if you place "STK:" followed by the stock number in the invoice description field of the header, the stock number will be used as the control when posting the expense account

Make a one time partial payment towards an invoice
Select Accounts Payable Menu>>Processing>>Invoice manager/check on demand.
Highlight the invoice number or type in the invoice number and press ENTER.
Type in the amount you want to pay immediately in the Payment field.

Press ENTER to save and the amount typed in will be highlighted in the Payment column.
Choose F10 to Print/Post.
Press Esc to exit.
Make an ongoing partial payment towards an invoice for all future check runs
Select Accounts Payable Menu>>Processing>>Invoice manager/check on demand.
Highlight the invoice number or type in the invoice number and press ENTER.
Place the cursor in the Partial Pay field
Type in the amount you want to pay each time you run the Cash requirements/check run option.
Press ENTER to save and the Partial Pay amount you typed in will show up as the amount to pay until you change it.
|
This amount will NOT default as the amount to pay when you use the Invoice manager/check on demand option. |
Press Esc to exit this vendor.
Press Esc again to exit the program.
If the totals on you AP Invoicing screen are to large you can press F6 at the bottom of the screen, that will bring up the pop up with the actual totals.

When you first get into the program there is a function key SF5 or click the button for invoice view that allows you to review invoices.

Once selected the following options are available:

If you select the custom date range, the date range screen will pop up.
